LEARNING CENTER

Articles, Training, Videos, Tips, eBooks, and More!

Subscribe ›

Subscribe ›

Avoid the Lemonheads: Proper Scaling & Cropping of Images

Design Tips

Avoid turning the people in your images into Lemon Heads

OK we've all done it. You have an image you really want to use for your website, blog or print project but it's either too tall or too wide. Still, you really want to use it, so you force it to fit anyway by using the Free Transform tool in Photoshop, or Fit to Frame in InDesign, or one of the many other image resizing tools out there. It fits, so your perfect layout is not compromised, and you go happily on your way. Soon the feedback starts: "Why does his head look like a football," "Why do I look so fat in that picture," "Why does she look squished?" That's when you realize somethings wrong.

You've had an attack of the Lemonheads.

The Problem

Distorted Face
Does this look right to you?
 
The source of your problem is that you've resized an image without preserving the original aspect ratio. This is known as Anamorphic Scaling, Disproportionate Scaling or Free Transform — Choose your buzz-word. They're all just fancy ways to say that you went willy-nilly with the width and height of your image with no regard to it's aspect ratio. The result is an image that just doesn't look right — either tall & too thin or short & too fat, with proportions that don't exist on any human being. Not only does this make your work look amateurish and silly, but it can also strain your relationship with whomever is in the photo. This can be a big problem if that somebody is a client or advertiser.
 

The Solution

The solution is Proportional Scaling and Cropping. Proportional Scaling, much like it sounds, is when we scale an image to size while maintaining the correct proportions of the image. Cropping is when you remove unnecessary or unwanted bits from a photo. Using these techniques, you can fit your image into just about any layout without compromising the integrity of the image itself.

Tools of the Trade

First let's go over what NOT to use. DO NOT use the scaling and resizing tools built into Wordpress, Joomla or any other CMS. DO NOT use the resizing tools in Dreamweaver, InDesign, Quark or any other layout program. To edit a photo, you should ALWAYS use proper photo editing software. My recommendations:

  • Photoshop
  • Gimp
  • Lightroom
  • Pixlr Express

The are, of course many, many others, but since I don't have extensive personal experience with them, I will not recommend them to you.

I'll be using Photoshop in this article.

Resizing

Properly Resizing a Photo in Photoshop
 
You should always start with resizing before cropping. When resizing a photo, take a moment to think ahead. How will I be using this photo? What size do I need it to be? Compare the size you need with the size you have, and always, ALWAYS keep a copy of the original. For our purposes, we're going to take a photo that is 1067 x 1600 and reduce it to 400 x 400. Now if I was to just change the image to this size with no regard for proportions, what you would end up with would look something like the first picture of the woman shown above.

If we change our height to 400 we'll only have 267 for our width, so instead let's change our width to 400. In Photoshop you would select Image -> Image Size from the top menu (Adjustments -> Resize in Pixlr Express, Right-Click -> Image -> Scale Image in Gimp). Make sure Constrain Proportions is checked, then enter 400 as your width. Press OK.

Cropping

Properly Cropping a Photo in Photoshop
 
When you're done resizing, you'll be left with an image that is 400 x 600. The width is right, but the image is still too long. This is where cropping comes in. When we crop our image we'll be throwing a part of the image away, so this will be a good time to think about what's really important in the image. For instance, in our image of the woman, it probably wouldn't be a good idea to crop into her face, leaving you with an image of a woman's neck & body.

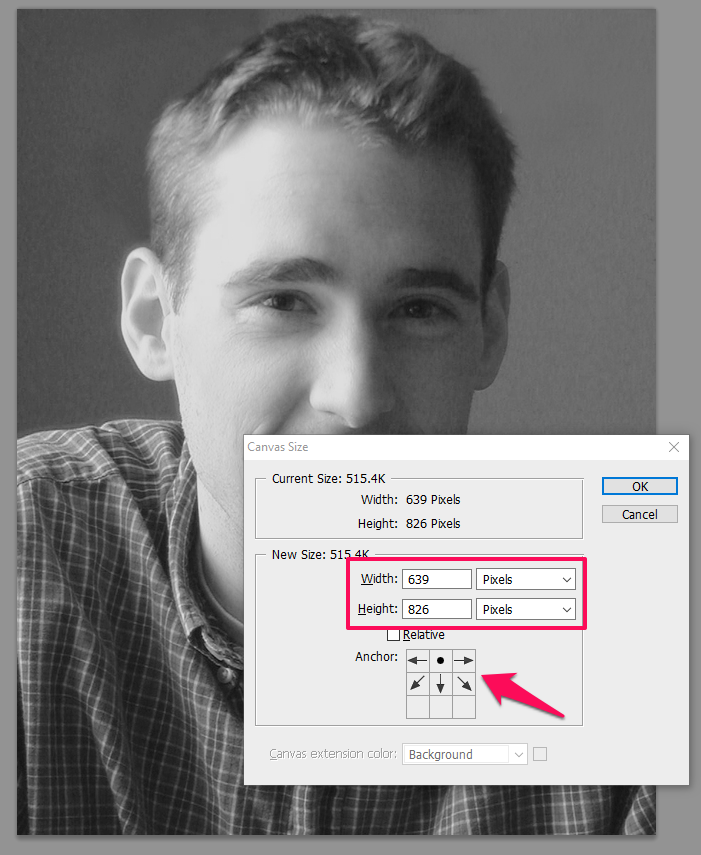
To crop your image in Photoshop select Image -> Canvas Size from the top menu (Adjustments -> Crop in Pixlr Express or Right-Click -> Image -> Canvas Size in Gimp). Change the measuring unit to Pixels and change the height to 400. Since we know we want to keep the top of the image where the woman's head is, select the top-center square as the anchor. Press OK. A warning will pop up telling you that the new canvas size is smaller than the previous one, and that clipping will occur. Click on Proceed.

Properly Cropped and Resized Image
 
The result will be a professionally resized and cropped image that looks great and fits perfectly into your layout. Your printer's happy, your webmaster's happy, your bloggers & content marketers are happy, but most importantly, your client's happy.  If the client is you, then that's an even bigger win.