


One of the most common mistakes that people make when they are preparing images for print is that they incorrectly size their images. Making sure that your image's size and resolution match is one of the easiest ways to ensure that your project will look its absolute best.
When you are preparing pictures for publication, it is important to think about how it will be reproduced. The two different methods that I usually use are print and internet.
Images destined for the internet are simple. Computer screen images are made up of little red, green, and blue dots that are placed right next to each other. There are 72 rows of these dots per inch, and therefore a 72 dpi image is sufficient for the web, or any other graphic that stays on your computer.
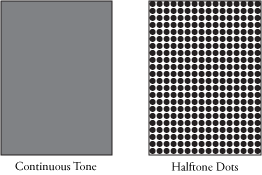
Print images are different. Printing presses cannot print shades of color. Each speck of ink that we put onto paper is either full intensity or not there at all. This made the printing of continuous tones a challange for many years. Luckily an invention was made called the halftone dot. A halftone dot is a series of dots that tricks your eye into thinking that they are a continuous tone. An example of this is shown below. Up close it appears as though the image on the left is a shade of grey. To reproduce this, we would print a series of dots. When these dots are viewed at a distance, your eye renders this as a shade of grey. Next time you have a newspaper look at it under a magnifying glass and you will see what I mean.
Before the desktop publishing revolution occurred in 1985, we used film to create our printing plates that by using a giant camera to take photos of layouts. When we were taking these giant photos, we placed etched glass "screens" on top of the continuous tone photos. These "screens" caused the images to be transformed into halftone dots. Today we use an advanced electronic workflow system that excludes the use of giant cameras or, in most cases, traditionally developed images. We have however maintained the use of the term "screen" to describe the resolution of our printing presses.
At Casey, we have two types of offset lithographic printing presses. These are sheet-fed presses and web presses. The web presses typically use uncoated groundwood stock to produce things like newspapers, and magazines. The sheet-fed presses typically print on coated paper and produce things like magazines, posters and, in many cases, covers for the publications printed on the web presses. The web presses print with a 110 line screen, and the sheet-fed presses use a 180 line screen. The number (ie 110) refers to the quantity of the rows of dots that are printed every inch.
When creating files to print, it is important that the files be small enough that they can be transferred online and processed quickly, but large enough to maintain the quality standard that your publication requires. This is why it is important to size your images appropriately to the printing process that will be used to produce your publication.
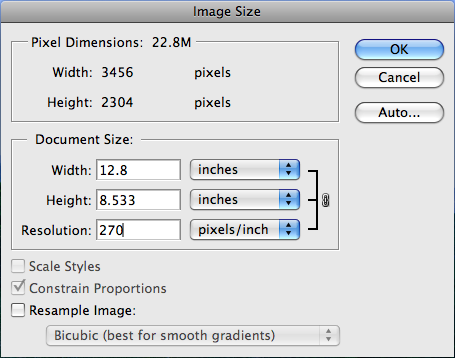
According to engineer Harry Nyquist, in order to achieve the correct tonality a photo should have twice the resolution as lines per inch (lpi) on the halftone screen. This means that a photo that is being printed on our web press should be at least 220 dpi. This is a good rule of thumb, however we have found that you will get identical results with 1.5 times the lpi. This means that if you have a job that is printing on the sheetfed press, you should size your image at 270 dpi.
What all of this means is that when you have photos ready to print, it is important to make an informed decision as to how to size them. The file size can easily be checked in Photoshop by clicking on image -> image size. Make sure that you un-check bicubic upsampling. This option tries to make enlarged photos look better, but often makes them look worse. Next type in your desired dpi for the photo that you are using. Photoshop will automatically calculate the size (in inches, milimeters, centemeters, percent, points, picas, or columns) of your image at your chosen resolution. If this size is sufficient, don't change a thing. If the photo can be a smaller physical size, then it is best to change the image size to something smaller and save it as a copy.
This may seem like a trivial thing, but too many times, we see images come through our workflow that have not been properly optimized. We see images that are way too big that cause both ours and our client's workstations to process files slowly and we see images that are too small that affect the way that a finished product looks. If you would like more information about file sizes, click here to download an essay by Graphic Arts Consultant, Cal Poly Graphic Communication Professor, and friend Brian Lawler that goes much more in depth about the technical aspects of file resolutions.