

Bleeds, or printing images and color right up to the edge of the page, are one of the easiest and most cost-effective ways to enhance the professional appearance of your print job. Having your graphics bleed delivers a more visually rich appearance, while typically not resulting in a significant increase the price. This is why most major publications and professional marketing collateral include bleeds as part of their design.
So why doesn't everyone use them?
Unfortunately, there is a lot of confusion and misinformation surrounding the process. Everyone has their own workflow and software they use to output their print files, and the procedure for including bleeds in your output file is different in every one of these scenarios. Sometimes, even with the right software, a lack of understanding of how bleeds work can lead to poor results. People that fall into this category might be asking:

What is a Bleed?
A bleed is as any image or graphic that prints right up to the edge of the page. You can find examples of this everywhere on magazines, posters, post cards, business cards, brochures and much more.
How are Bleeds Done?
A bleed is achieved by building a design that is slightly larger than the finished size, printing the job at that larger size, then cutting the sheet back to it's finish size. This results in us trimming the white border and some of the image area, thus creating the illusion that the job was printed right up to the edge of the paper. If a sheet is not trimmed, you'll end up with a white border around the image area called a gripper edge or gripper margin. This is the area the press grabs onto when it is pulling the sheet through.
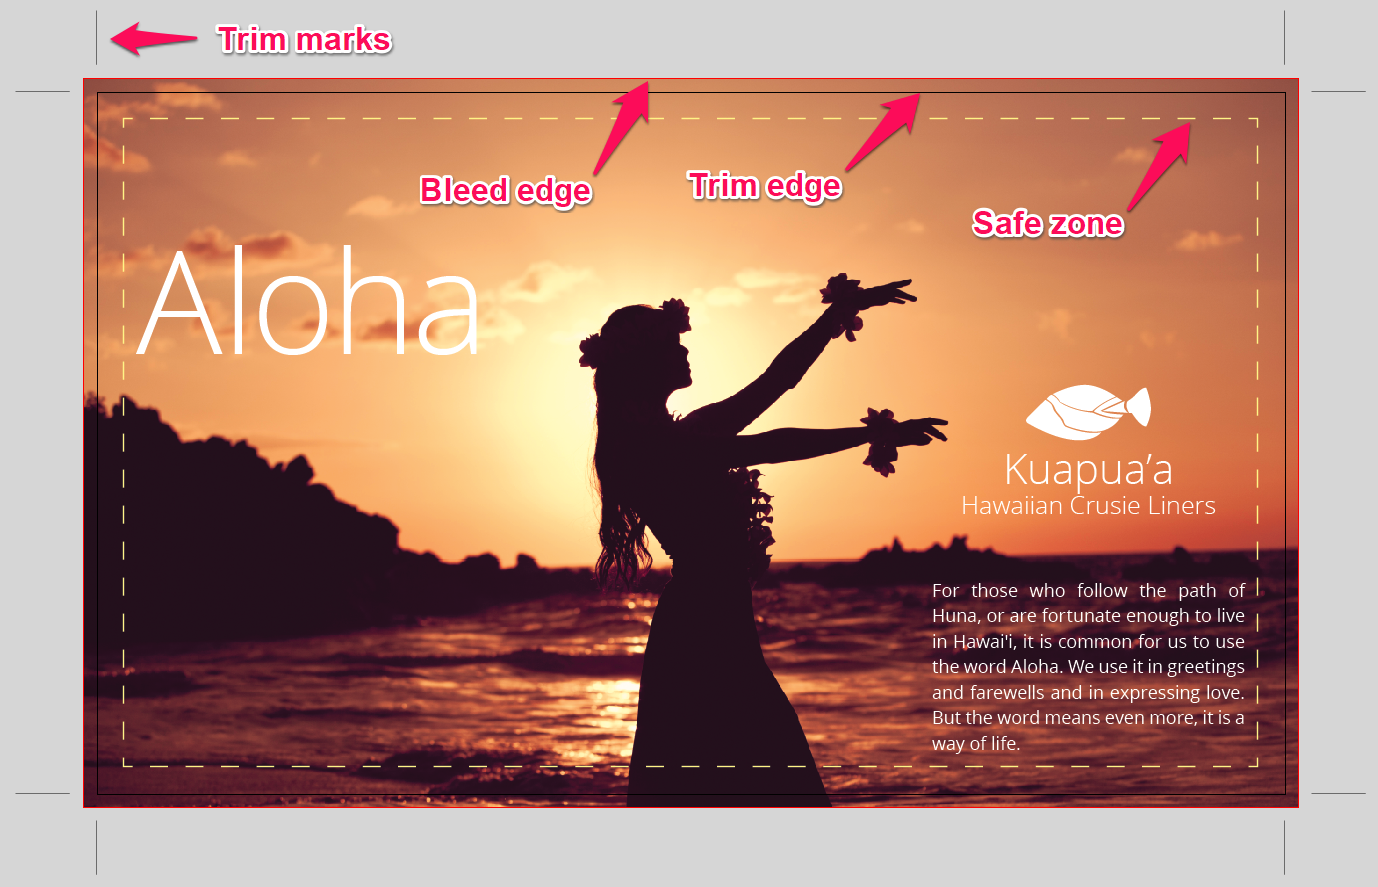
How Do I Make My Print Jobs Bleed?
Every program does it a little differently, but the principle remains the same in all of them:
- Add a ¼ inch to both your height & width.
Most printers need about an eighth of an inch bleed on all four sides. This will result in a document that is a quarter inch taller and wider than your finished piece (⅛ + ⅛ = ¼). - Run colors and images that will bleed to the "bleed edge"
Determine what colors and images you would like to bleed and make sure that they go all the way to the bleed edge, or ⅛" past the trim edge. - Create a "safe margin" or "safe zone"
You'll want to create a safe zone at least ¼ inch inside your trim edge (or ½ inch inside your bleed edge) and keep all of your text and important content inside this zone. If your text gets too close to the trim edge, there's a good chance it will get cut off. Also, it just looks bad to have type that close to the edge. - Know Your Tools
If you use industry standard software such as Adobe InDesign or Quark Express, the support for bleeds is built right in. Get to know these tools as they'll make your life much easier when preparing your files for bleeds. - Ask for help
If you find yourself struggling with it, and you just can't seem to get it right, don't be afraid to ask for help. Your print provider knows what they need and can usually steer you in the right direction. They may even have templates you can use. Otherwise, you can hit that "Talk to an Expert" button below and we'll be happy to answer any questions you have about bleeds.