
So you want to build a print file in Keynote:
At CASEY, we wholeheartedly believe that you should always use the best tool for the job. For print layouts, we suggest using Adobe InDesign. Sometimes you've gotta work with the tools you have though, and sometimes that tool is Keynote.
Since Keynote is not designed for producing print files, there are some tricks to make it behave. Here's how to whip it into shape:
Step 1: Determine size and bleed of the document you would like to print.

Start by figuring out what size you would like your document to be. In this case, we're going to set up a 5.5" x 8.5" document - but these steps may be adapted to any size.
You will also need to determine how you would like to set up your bleeds. Around here, we reccomend 1/8" - so that's what we will go with for this tutorial.
When setting up your doucment in Keynote, the tool does not allow you to specify bleeds, so make sure to add them to your page size. In this example, our page size becomes 5.75" x 8.75"
Keynote does not allow documents to be set up in inches, but rather in points (pts.) There are 72 pts in an inch, so multiply your size by 72. Note: In earlier versions of Keynote, this measurement was in pixels, and multiplying your size by 300 was the suggested way to construct a print document. This has changed.
| Width | Height | |
| Final Size | 5.5" | 8.5" |
| Bleeds (on each side of the document) | 0.125" | 0.125" |
| Document Setup Size in Inches (Final Size + Bleed for Each Side) | 5.75" | 8.75" |
| Document Setup Size (In Points) | 414 pt | 630 pt |
Step 2: Create Document

Select your favorite theme in Keynote. In this case, we will use the plain white one.
Step 3: Setup Keynote Document Size

Select the "Document" button in the upper right hand corner of the screen.

Click on the "Slide Size" dropdown menu and select "Custom Slide Size"
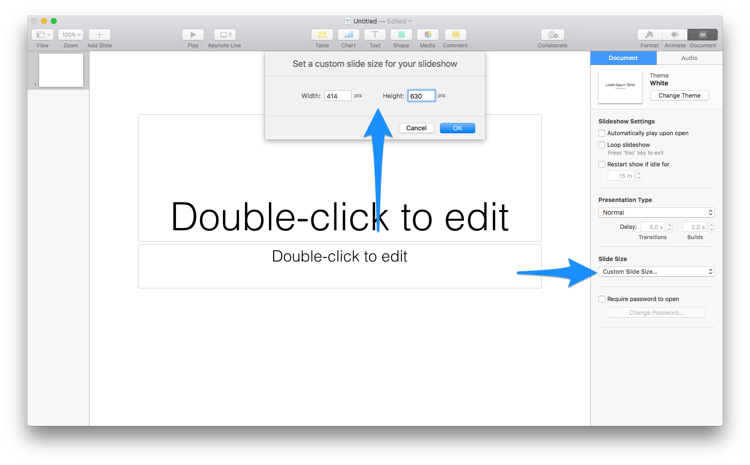
When you select "Custom Slide Size" a window will appear at the top of the screen. Enter the values determined in Step 1 (414 x 630) - then click "OK"
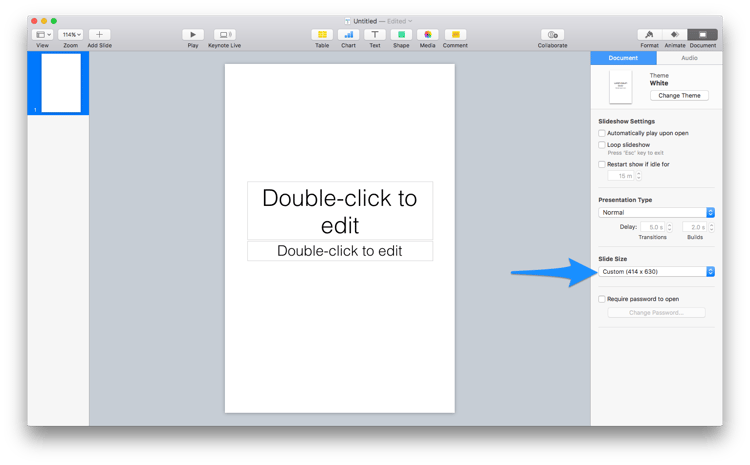
The "Slide Size" should now reflect your custom size
Step 4: Use rulers to show bleeds

Keynote does not have a bleed mechanism, but it does have rulers. Using rulers is the best way to show where bleeds are because you can drag a "guide" to a specific spot - eliminating guesswork.
Rulers are not shown by default, so go to View/Show Rulers or hit ⌘R

Now you can see the rulers located on the top and side of the document.

Click in the ruler area and drag onto your page, and a guide will appear. As you drag, the location of the guide will appear in a dialog box. In decimal form, 1/8 of an inch is 0.125. Keynote only shows 2 decimal places, so you will need to approximate your guide locations at 0.12 inches.
This step will need to be repeated for each page you add.
Step 5: Buliding Your Document

To add pages to your document, click the "Add Slide" button on the screen. Each slide will maintain the same size as the first one you re-sized.
As you're building your document, here are some things to keep in mind:
- The first slide will be your front cover
- The last slide will be your back cover
- If your document will be saddle stitched (stapled like a magazine) make sure to add pages in incraments of four. For other binding meathods, add pages in incraments of two.
Step 6: Outputting Your Document

To export your file as a PDF, navigate to File/Export/PDF

In the dialog box that appears on the page select "best" on the "image quality" dropdown menu
Once you click "next," you will be prompted to choose a location and save your document. That's it!
Step 7 - Checking Your Work

Before sending a file to print, it is always a good idea to check to make sure it exported as anticipated. To do this, open the file in Preview, a PDF tool that has shipped with every Mac in recent years.

In order to see information about the file, you're going to need to use the "Inspector." Click on Tools/Show Inspector or ⌘I to launch the tool.

When the Inspector tool is launched, click on the icon that looks like a ruler, then check out the "Size" section. In this case, you can see that the document size is 5.75 x 8.75.
Unfortunately, Preview does not display resolution, but we used magic printing tools to ensure that the document is output at 300 DPI.
There You Have It:
Although Keynote is not the best tool for the job, since it does not have many print-centric features - it is capable of producing a clean PDF that may be used for Print. Please let us know if you have any questions.
If you'd like to know more about getting you Keynote, or any other file type, print-ready, have a look at How to Prepare Your Files for Print.