
If you're a designer or a publisher, or even if your a hobbyist, there's going to be a situation sooner than later where you're going to want to have an image, color or other graphic print all the way to the edge of your final printed product. This is known in the creative & printing circles as a "bleed." In this article I'm going to show you how to add a bleed to any Adobe InDesign, Adobe Illustrator or Adobe Photoshop document. So let's get started!
What is a Bleed?
A bleed is a color, photo or graphic that prints right up to the edge of the paper or other material. This is achieved by printing an image area larger than the final size, and trimming it back. Although there are some "borderless printers" on the consumer market, most of these are not practical for commercial applications, so the print and trim method is the current standard for borderless printing.
The good news is that setting up bleeds in Adobe's software is very easy, and I'll walk you through it step by step. Just jump down to the heading that matches the software you're using to setup your document.
Adding a Bleed in Adobe InDesign
In InDesign (and really any Adobe software), the best time to setup your bleeds is when you're first creating the document. Here's how you do it.
- Create a new document by using the CTRL+N hotkey (COMMAND+N on OS X), or by navigating to File > New > Document in the menu. You can also click the Create new button.
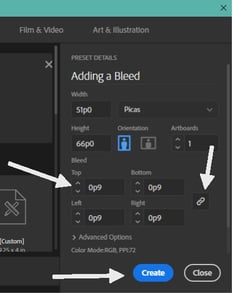
- Next, name your file, enter the final document size (the size it will be after trimming), then click on the Bleed and Slug link.
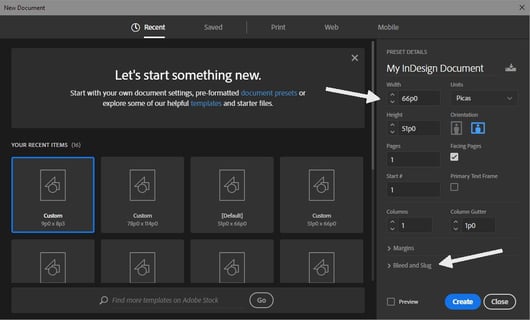
- Make sure the link icon is selected (this way you only have to enter one value for all 4 sides) and enter the size of your bleed margin. A typical bleed margin is ⅛ inch (0.125 inches), or 0p9 picas. Click Create.
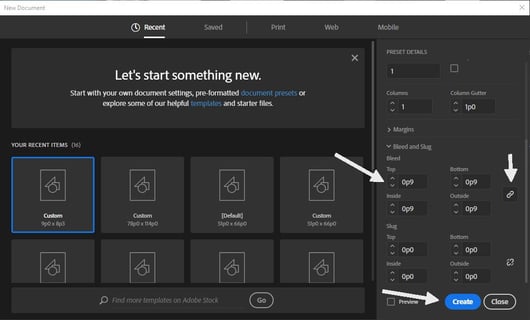
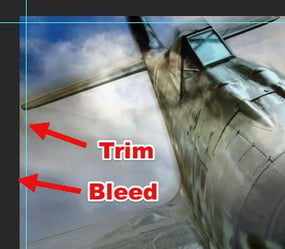
- In your new document you should see the bleed margin. It will be the red guide on the outside of the canvas. If you place images and graphics that overlap both the canvas and this area, you will now have an image or graphic that "bleeds," or is borderless.
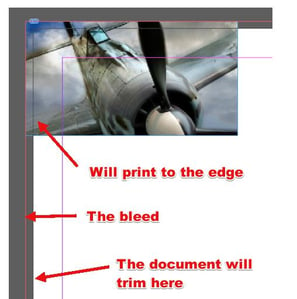
If you enter the Preview mode, you will see where your image or graphic will be trimmed.
Adding a Bleed in Adobe Illustrator
Setting up a bleed in Illustrator is pretty much the same as setting it up in InDesign, although the interface is a little bit different.
- Create a new document by navigating to File > New or using the CTRL+N hotkey (COMMAND+N in OS X).
- Name your file, set your width and height, then, making sure the link icon is selected, enter your bleed value. Again a typical bleed should be ⅛ inch (0.125 inches), or 0p9 picas. Now click Create.
- After the document is created, you should see a red margin just outside of your canvas. This is your bleed margin. Placing graphics that overlap both the canvas and the bleed margin will result in borderless graphics.
Adding a Bleed in Adobe Photoshop
Adding a bleed to a Photoshop document is a bit of a different story than Illustrator and InDesign. Since Photoshop is primarily a photo manipulation and editing software, it is not really designed for easily creating press-ready files on its own. The obvious intention is that you'll place your Photoshop document into InDesign or Illustrator to create your final print files. That being said, it is possible create a "bleed" in Photoshop... sort of.
Please note: using Photoshop the create press-ready files intended to bleed requires some coordination with your printer.
- When you create your Photoshop document, make it 0.25 inches larger than your final size on your width and height. So for instance, if you're printing your document 8.5 x 11 inches, you'll make your Photoshop file 8.75 x 11.25 inches.
- Since your intention is to create a print-ready files, it wouldn't be a bad idea to set the Resolution to 300 Pixels/Inch and the Color Mode to CMYK Color.
- Next, open up your Rulers by navigating to View > Rulers or by using the CTRL+R hotkey (COMMAND+R in OS X).
- Now create a new guide by navigating to View > New Guide. For an 8.5 x 11 document, your guides would be setup 0.125 inches in from all four edges like this:
- Horizontal: 0.125 inches
- Horizontal: 8.625 inches
- Vertical: 0.125 inches
- Vertical: 11.125 inches
Now it will be obvious where your document will be trimmed, and you can setup a "safe zone" to keep text and other important elements from getting too close to the edge.
Finishing up
When your design is complete and you're ready to send it to your printer, follow these steps to complete your press-ready document:
- Use the "Save As" command (instead of Save) by invoking the CTRL+SHIFT+S hotkey (COMMAND+SHIFT+S in OS X) or by navigating to File > Save as.
- In the Save as type selector, choose Photoshop PDF.
- You may get a warning about your current settings being overridden. You can safely ignore this warning.
- In the Save Adobe PDF dialog, make sure you're using a "Press Quality" preset
When you're done, you'll have a press-ready file for the most part, but it will be missing the bleed box in the PDF file. This is where you'll want to coordinate with your printer. Let them know that the document bleeds and what size it should trim to. Since the file you provided is larger than your final trim size, your printer should be able to make this work for you.
If you'd like to learn more about making files print-ready, check out How to Prepare Files for Print for more information and resources.
Hope you enjoyed learning about setting up bleeds for borderless printing in your Adobe documents. Of course, if you're struggling,  . If you have any questions or would like to add your own tips for adding bleeds to Adobe documents, sound off in the comments below. Thanks for reading!