
Normally when supplying files to a printer or service provider, a PDF file does the trick, but there are situations in which you may need to provide a little more. For instance, if you need your printer or a design firm to make changes to your copy or graphical elements, a PDF is not a good choice. In these situations it's appropriate to supply "native files," which is shop talk for a copy of your original files, links and fonts.
The good news is InDesign makes this very easy with a feature called "Package." The package feature neatly collects all of the links (images, documents, vector art, etc) and fonts and puts them in a folder with a copy of the original InDesign files. It will even re-link the links to work with the new folder! Need an IDML or PDF file to go with that? It'll make those for you, too!
Before we delve to deep into packaging your files, you may want to make sure you've got the basics down by having a look at How to Prepare Your Files for Print. Otherwise, read on!
Getting Started
First step is to open the document you would like to package. Once the file has completely loaded into InDesign, start the packaging process by using the CTRL+ALT+SHIFT+P hotkey (COMMAND+ALT+SHIFT+P in OS X) or by clicking File > Package.
The Package dialog box will open on the Summary page, which will notify you if there are any issues with packaging file. Notice in the screenshot below how the package summary is warning us about images using the RGB color space?

At this point you can also flip through the different tabs in the Package dialog to review the fonts, links, colors and other information that will be included in the package. For now, let's continue by clicking the Package button.
Printing Instructions
In general, you can safely ignore this dialog and just press Continue, but if you need this information to be included with the files you intend to supply then you can do so here. When the package is created, it will include a text file that contains the information that you provide here.
Choosing What to Include in Your Package
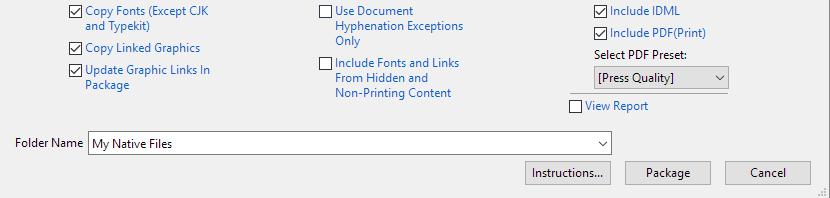
After the Printing Instructions dialog, a window will open asking you where you want to save your package, what you want to name it, and what you want to include. There are a lot of choices here, so we'll go through them one by one.
Copy Fonts (Except CJK and Typekit)
With this option selected, your package will include all the fonts used in your document, with the exceptions of CJK (Chinese, Japanese, Korean) and Typekit fonts. CJK fonts are excluded because they tend to be too large, and Typekit fonts require an active Creative Cloud subscription (and are therefor not transferrable). Keeping this selected is Highly Recommended.
Copy Linked Graphics
This option will determine whether or not to include linked documents and graphics. Since including an InDesign document without these assets is nearly pointless, keeping this selected is Highly Recommended.
Update Graphics Links in Package
This option tells InDesign to re-link all of the graphics inside the package to the InDesign document in the package. Unless for some reason you want your provider to be attempting to link to assets located on your computer for some reason, keeping this selected is Highly Recommended.
Use Document Hyphenation Exceptions Only
This option prevents text reflow when the document is opened on a computer that has different hyphenation settings. This option is typically not required, but if you're sending the document to an outside vendor for editing, it is recommended.
Include Fonts And Links From Hidden And Non-Printing Content
This option packages links and fonts on hidden layers and other non-printing content. Unless you really need to include these objects for some reason, this option in not recommended.
Include IDML
An IDML, or InDesign Markup Language file is a special type of file that allows your document to be opened in earlier versions of InDesign (CS 4 or greater). If you're sending your file out to be edited by an outside vendor or even someone else in the office, you may not know what version of InDesign they're using. For this reason, keeping this selected is highly recommended.
Include PDF(Print)
With this option you can include a PDF of your document using any default or custom PDF presets available to you. This is generally a good idea, since it will give your vendor a clear idea of what the document should look like. This is recommended.
By now you should have a pretty clear idea of how to package your InDesign document. Of course, if you're still note sure,  . If you have any questions or would like to add your own tips for packaging InDesign documents, sound off in the comments below. Thanks for reading!