

One thing we get asked a lot working in a commercial print shop is how files should be sent to us. Generally this strikes up a conversation about file types, the software they're using, and how to make those files work with our workflow and presses to get the absolute best results. That's why I decided to somewhat demystify the process by providing 5 easy steps to create press-ready PDF files using Adobe InDesign. If you're not using Adobe InDesign, or you've rather have a more generalized info, have a look at our post How to Prepare Files for Print. Otherwise, read on.
1. Use Preflight
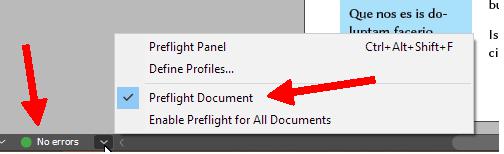
InDesign has a built-in preflight feature that you should definitely be using. It's typically on by default, but you can double-check by going to the left side of the bottom bar of your InDesign window (directly left of the bottom scroll bar). If it says "Preflight off" click the preflight menu button next to this message and select Preflight Document to turn it on.
Preflight will check to make sure all of your links (images) are current and not missing. It will also check for missing fonts or overset text (text that does not fit within the text boxes you've created). If the preflight indicator is green then you're good to go. If the indicator is red then you can open the Preflight Panel via the preflight menu, or by using the CTRL+ALT+SHIFT+F hotkey (COMMAND+ALT+SHIFT+F on OS X). The panel will show you what the errors are and the pages on which they appear.
Preflighting your document regularly is a crucial step towards a trouble-free and predictable printing result.
2. Build a Custom Preset
Adobe InDesign comes with several helpful built-in PDF presets. Unfortunately, they leave something to be desired in the context of a modern professional printing process. This is why it's a good idea to custom-build your own preset, or to ask your printer to provide you with a preset that works with their specific workflow and equipment. Luckily, this is not as hard as it sounds.
- Press CTRL+E (COMMAND+E on OS X) or File > Export to initiate a PDF export
- Name your file, click save
- In the Export Adobe PDF dialog box, choose [Press Quality] as your preset
- Change Compatibility to Acrobat 7 (PDF 1.6)
- Click Save Preset
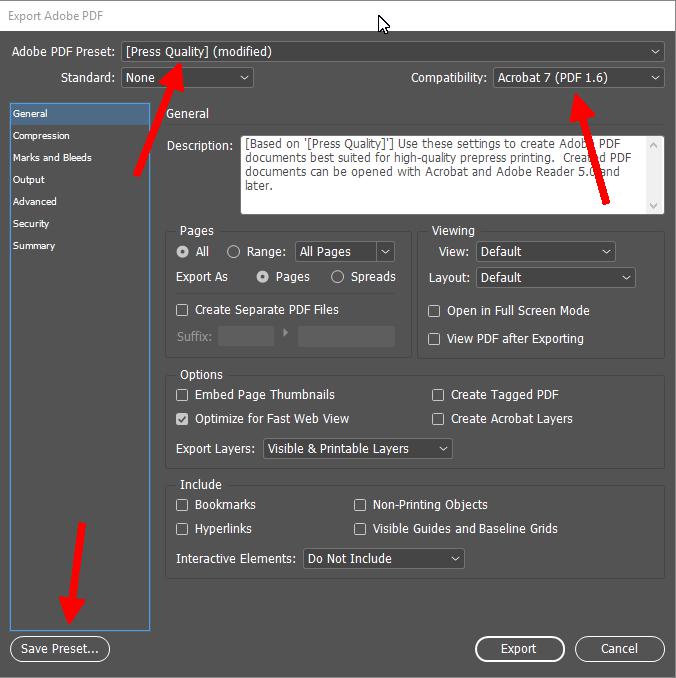
Once you name and save your preset, you'll be able to use this preset again and again. Keep in mind: if your printer has a preset they would like you to use, always use theirs rather than your own when sending files to them.
3. Check Your Settings
In addition to the settings you managed in Step 2, there's a few other settings you should be aware of. Once you have these settings the way you like them, you can include them in your custom preset:
General > Pages
Here All should be selected (instead of range) and "Export As" should be set to Pages (not Spreads).
Marks and Bleeds > Marks
Make sure no printer's marks are selected. You should never send files with printer's marks unless your printer specifically requests them.
Marks and Bleeds > Bleed and Slug
"Use Document Bleed Settings" should always be selected. If your document has no bleeds in won't hurt anything, but if it does, and this isn't selected, the PDF will not include them.
Output > Color
The safest setting here is to set "Color Conversion" to No Color Conversion. Unless you need to use a specific profile, the printers RIP will take care of color management. Converting colors here can sometimes lead to unpredictable results.
4. Check for Warnings
Before you export your file from InDesign, have a look at the Summary tab to be sure there are no warnings. If you see any warnings, find out what they are, go back to your document and fix them, then try exporting again.
5. Proof Everything
Whether it be an online proof, PDF, print out or hard-copy proof, check everything! Check your table of contents. Check your page numbers. Read and re-read the copy. Have other people read it. Check the quality of the images. Check the color. Basically, check everything! It's much cheaper to spend a little extra time proofing your document than it is to re-print it.
If you want more info, don't forget to check out How to Prepare Files for Print.
Congratulations, your file should be perfect now! Or at the very least, better than it was. Thanks for reading. If you have any questions or would like to add your own tips for producing print-ready files from InDesign, sound off in the comments below. Don't forget, if you ever need us,  .
.