
It's happened to all of us at one time or another. You design something, it looks great on your screen, you get it back from your printer and... ugh! Your beautiful design has blurry, jagged-looking photos. What happened? More importantly, how do you make it NOT happen? In this article I'll walk you through the science of how image resolution works in print and on-screen to answer both of those questions. So you'll understand why your photos are blurry and learn how to prevent it from happening to you again. Let's dig in.
Screen Resolution vs Print Resolution
The differences between the technology behind displaying an image on your computer screen and printing an image on paper can create many potential pitfalls that might adversely affect your printed product. One of the more important differences is resolution. The resolution used by your computer monitor and the resolution used by the press are very different.
The average computer monitor displays images with about 72-96 pixels per inch. The average press or inkjet printer prints images at around 300-1200 dots per inch. What this means is that it takes less picture information to display an image on your screen than it does to print your image on paper. So smaller images will look bigger on your screen, while bigger images will look smaller in print.
If you try to print an image larger than the size for which the image has available information, the image will begin to look jagged or blurry. This is known as "pixelization," because the printer is literally making the pixels of the image larger to account for the lack of picture information.
Image Resolution vs Dimension
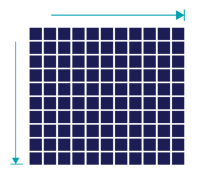
One thing that is not always commonly understood about image resolution is the relationship between image resolution, image dimension and the resulting image size. The common industry mantra is to supply all of the images in your document at 300 dpi (dots per inch). The implication is that if you do this, your images will print fine, but what is really meant by this is that your images should be at least 300 dpi at the final printed size of the image. This is where knowing your image's actual dimensions (e.g. pixels wide x pixels tall) can be crucial.
For example, if you have an image that is 300 dpi, and has a pixel dimension of 300 x 300, you have enough image information to print an image that is 1 inch x 1 inch. So guess what happens if you scale that image to 6 x 6 inches? That's right: pixelization. Since you've scaled that image to 600% of its original size, it is now printing at an effective dpi of 50. To fill that 6 x 6 inch image area, you would need an image that has much greater pixel dimensions: 1800 x 1800 pixels to be exact.
So remember: setting your resolution at 300 dpi is important, but always make sure you have enough pixel information in your image to completely fill the area you are using it on your printed product. Here's a simple formula you can use to make sure that you're always providing images that are large enough for print:
dimension (pixels) ÷ 300 = size (inches)
So for example:
1200 (pixels) ÷ 300 = 4 (inches)
You can do it the other way around as well. So if I needed an image that was 12 inches wide, I would use the following formula to figure out how big my image dimensions need to be:
size (inches) x 300 = dimension (pixels)
So for example:
12 (inches) x 300 = 3600 (pixels)
Basic Tips for Printing Great Images
Never trust your screen
You computer monitor is a great tool for visually managing your layout and typesetting, but it's not as reliable for proofing color or printed image quality. For this reason, it's usually a good idea to print proofs as you go, or to request a hard-copy proof from your printer.
Consider the source
You've worked hard on content, layout, proofreading and making sure everything is perfect, why skimp out on images? Consider having your images professionally photographed or purchasing professional-quality images from royalty-free image vendors like iStock Photo or Adobe Stock.
Talk to your printer
It's always a good idea to communicate your print expectations to the people who are doing the printing. They'll be your best resource for determining what will work and how things will look, and communicating your expectations will give them a standard for which to achieve.
Consider professional help
OK, I'm not talking about a psychiatric help here. What I mean is that you should consider whether a professional designer is in the budget. If you don't already have one, you might find that having one could save you a lot of time & headache, and will generally result in a superior product.
In addition to having great photos, there are many other factors that go into creating a great print product. If you'd like to learn more, have a look at How to Prepare Your Files for Print.
That's it for this one. Thanks for reading. If you have any questions or would like to mention your favorite tips for avoiding blurry images, sound off in the comments below. Don't forget, if you ever need us,  .
.