There's no doubt that the tri-fold or letter-fold brochure is one of the most popular brochure formats we see being used today, but one format that tends to get overlooked is the z-fold brochure. In this tutorial, we'll be looking at the basics of how to create a z-fold brochure in Adobe Illustrator CC. But first:
Tri-Fold vs Z-Fold
A very versatile format, the z-fold brochure has some subtle but important differences from the tri-fold brochure that might make it a better fit for certain design approaches. It sort of splays out like an accordian to create an open spread. This makes it a great format for poster-style large image or design spreads, charts and other designs that need more room than a single narrow panel.
Tri-folds on the other hand are better suited for information "booklet-style" brochures, where we want content to be defined by and framed within each panel. Both are useful, but it might be a good idea to think about what sort of brochure your designing when choosing a format. Tri-fold will typically be a better choice for an info-brochure, whereas z-fold might be better for a brand awareness brochure. It all depends on how you want to approach the design and how you want the reader to interact with the brochure. You can learn about other types of brochures and folds by having a look at our post about the different types of brochures.
Before we get started, take advantage of this free template download and follow along. You may also want to reference our 10 Pro Tips for designing a brochure that gets results.
Determine Your Document Size
First things first, let's figure out what how big we want this brochure to be. The most common size in the US is Letter (8½ x 11 inches, 51 x 66 picas or 215.9 x 279.4 mm), so for simplicity's sake, we're going to use that in this tutorial and also in the downloadable template. We're also going to add a ⅛ inch bleed (0.125 inches, 0p9 picas, or 3.175mm) so our images and graphics can print right up to the edge of the paper. You can learn more about bleeds on this page.
Create Your Document

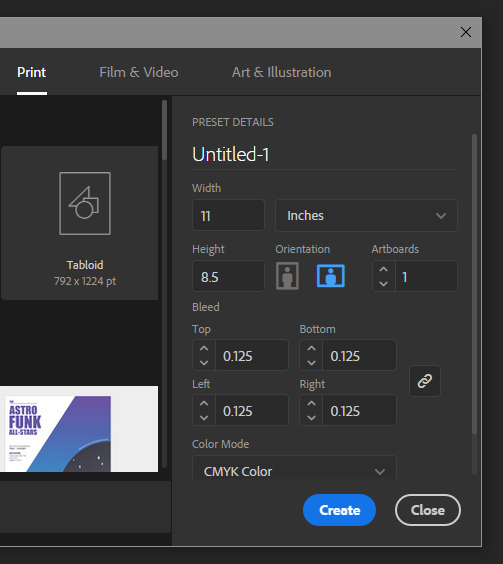
Let's get to the good stuff. Create a new document in Illustrator. Select Print from the top menu (this will change your colorspace to CMYK and raster effects settings 300dpi in one click, so it's a good habit to get into). You'll want to set the width to 11 inches and the height to 8.5 inches (or equivalent). This should automatically set the orientation to landscape. Now set your Bleed to 0.125 inches (or eqivalent). When your ready, press Create.
Find Your Folds

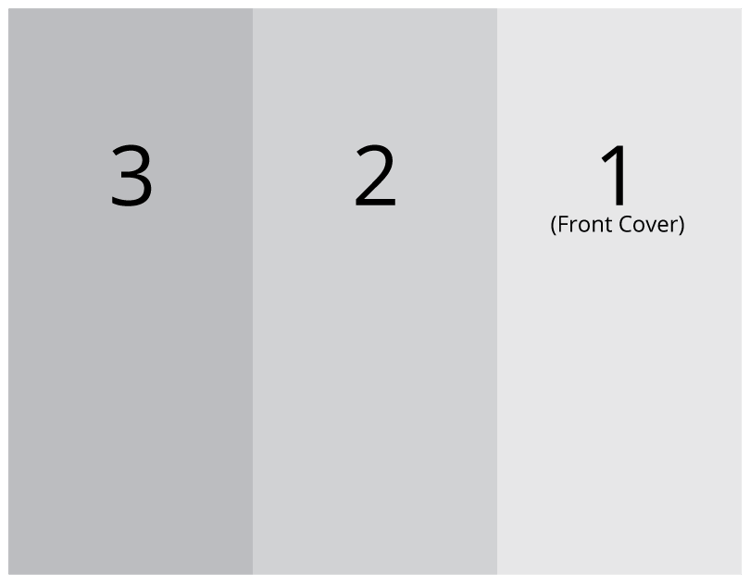
The next step is to figure out where the panels and folds will be. Luckily, this is very easy on a z-fold brochure because, unlike the tri-fold, all the panels are exactly equal. So to figure out your panel widths, all you have to do is divide your un-folded finish width (11 inches) into three parts. This will give you a panel width of 3⅔ inches (3.6667"). If your using picas, this is easy, as it will be 22p0.
Note: One thing to keep in mind with z-fold brochures is the way the panels will open and how your readers will interact with them. I favor the 3-2-1 approach (as shown in the image), because it encourages the reader to open the brochure wide like a poster, but can still be opened like a book. I have seen them folded opposite of this, but we'll be using the 3-2-1 approach here.
As with all brochures, think about the experience. What will the reader see when they first look at the brochure? How will they open it? What will they see then? What if they open it a different way?
Create Your Guides and Margins

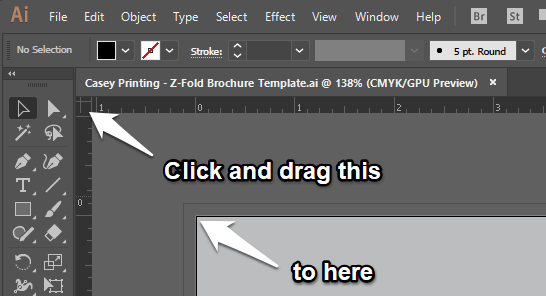
Now that we know where our folds are, it's time to create our margins. Before we do this, we should set our zero point to the upper-left corner of the canvas. To do this, open up your rulers (CTRL + R, or COMMAND + R on a Mac), then click and drag from the box where the x and y rulers meet to our desired zero point.
Now that our zero point is set, let's set our margins at 3.667 and 7.334 inches (22p0 and 44p0, or 93.113mm and 186.267mm). This is where the score line for our folds will be. You may also want to create additional guides to the left and right of these, and around the edge of the document to establish a "Safe Zone" for text.
Don't Forget the Reverse Side
There are two sides to this brochure, so let's go ahead and create the second side. Open the Artboard Tool by pressing SHIFT + O. Now select the first artboard, and while holding down the SHIFT and ALT buttons, drag the artboard down until it's cleared it's original space completely. When you let go of the mouse (still holding SHIFT and ALT), a duplicate artboard should appear.
If you did it right, your vertical guides should be right on target for the second artboard, and all you'll need to add is your horizontal guides.
Save Often
If you haven't already, save your work. Do this often, because you never know when your program may crash, power go out, etc. So save every time you do something you want to keep, or every 5 minutes. Whichever comes first.
Be Awesome!
Now that you have a working template, save it and hang on to it. You'll be able to use it time and again any time you need to design a z-fold brochure. But most of all, just get out there and make some awesome designs!
Don't forget to scroll back up and download the free z-fold brochure template if you haven't already.


